Monday, January 23, 2012

That Teeny Tiny Line

In my last blog posting I promised to post how I add my narrow line of fabric between the edge of the quilt and the border.
I love it when something that looks really hard is actually very easy.  Separating your border from your quilt body with a thin line is one of those things. It’s a cinch to add a quarter inch, half inch or 3/4” inch separating line to your quilt creating a perfect frame.
border[2]
(And yes, the line is close to perfect, the minor curves here are actually where the fabric is relaxed.)
So, what’s the secret?  How do you do it?
Start with Straight Sides:
Start with a quilt where the 4 sides are straight. Your success is requires that the edges of your quilt be perfectly straight.
Cut the Fabric for your Line:
Cut the fabric for your narrow border (the cream shown here) 1/2” wider than the width you want the finished line. For a 1/4” line, cut your fabric 3/4” wide. For a half inch line, cut the fabric 1” wide, etc. The length of the fabric depends on how you plan to finish the border. For a mitered corner, make sure the length of your narrow border fabric is the length of the quilt side plus twice the width of your narrow border. For example, if your quilt is 70” long and your narrow border 1/2” wide, the fabric for that side of the quilt should be 70” + 1/2” + 1/2”.  At this point you can add an extra inch or two for safety. 
Stitch your Line to the Quilt:
Carefully match the edges of your narrow border fabric with the edges of your quilt, right sides together.  Stitch with a  1/4” seam.
back-of-fabric.

add-border-2
Attach the Next Border:
Next you will stitch on the next border, the wide one, (A in the drawing above). Place this border against the narrow border, right sides together, with the narrow border on top.

closeup-with-presserfoot

Use Your Presser Foot:
As you stitch the border to the narrow border, your first impulse is to make sure that your stitching is a consistent distance from the edges of the fabric. What is actually important is keeping your stitching a consistent distance from the first line of stitching (shown here as B).
To keep your next line of stitching a consistent distance from the first line of stitching, keep the left side of your presser-foot right next to the first line of stitching.  Move your needle to the left or right until it is as far from the first line of stitching as you choose to make your narrow border.
Stitch:
Using this technique I can add a perfect narrow border between the border and the edge of the quilt.
Although the instructions here are for a quilt, the same technique works for adding a narrow line of fabric in a garment or any other project.

A Note of Self Promotion:
We're releasing  my newest design set today, Flights of Fancy.  Make sure you stop by our site to pick up the free sample.

Monday, December 12, 2011

Quilt Finishing 101

Recently some unknown spirit has channeled me, a slightly overzealous garment sew-ist and turned me into a, (dramatic pause with drumroll) a quilter.
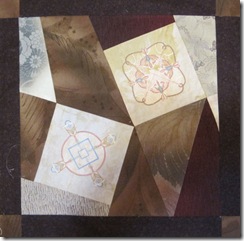
The quilt I’m working on has been long in the making. I designed and stitched the squares two years ago when I first released the overtures set.
square_1
I’ve used this set many times (there are lots of samples on the Overtures webpage) but usually in bright, colors. This quilt was designed to showcase another, more subtle side of the set.
close-up2
The completed quilt-squares had a special place in my home along with seventeen other pieces awaiting the completion fairy. When I upgraded the sewing room, the quilt squares warranted their own cubby in one of the new sewing cabinets
The quilt squares came out of the closet this summer when I took them to a sewing retreat and sashed and assembled them. Then, back into hiding they went.
Yesterday, a mere 4 months later I brought the quilt top out to finish.
I spent most of the day adding the borders. It wasn’t hard. Things went smoothly. It was just time consuming.
border
I chose to add a 3 1/2” wine colored border separated from the outer line of sashing with a half inch cream line.
It took several hours to put in the mitered corners. By the fourth corner I had finally assimilated information I'd been gathering for a while. Several years ago, I took a finishing class from Pam Gerkovich, a local quilting guru. A year after that Suzette Heinrich, another incredible local quilter, showed me her secret for great mitered corners.  A year later I shared  some  time with Trish McCrumb, another quilting aficionado, who showed me her system. I've taken the best of all these and made it work for me. I have 4 perfect miters now.
I think the methodology for the 1/2” line of sashing and the instructions for the mitered corners are worth a write up.  Watch this blog.
Tomorrow back to the real world.  I'm posting stuff on Etsy- putting together another sale and doing another newsletter.  I'll get back to trying starting a Bullard Designs Facebook page - calling the local schools to talk about sew camp... and sew on and sew on.
Good night. 

Monday, November 28, 2011

My Form of Procrastination

I’m probably not alone in that I have a to-do list longer than the average 10 year old’s list for Santa. My to-do list starts with designing the web pages for our Colorful Monday sale (our response to black Thursday) and making samples for the children’s Sew Camp I’m hosting during this year’s winter vacation, pretty important tasks. Despite that, I started a new project. And… I’m sharing it. 


To start at the beginning, my son and his significant other, the lovely Chisa, will be decorating their apartment for Christmas for the first time this year. You know what that means. I can make a present that they’ll actually use.


My first thought was to make them one of my mantle scarves using my Bell Choir designs. The scarf is easy-to-make and stunning. Unfortunately, a mantle scarf loses its charm if you don’t have a fireplace and mantle. Alex and Chisa don’t.

Mantel Scarf
The Mantel Scarf
This is what the bells look like close-up. This particular one is the free sample. Go to the Bell Choir page to download it.

Obviously I needed a plan B. Hmmm… Everyone can use a table runner.
Back to my story. It just sew happens I was rummaging around in my stitch-out hamper last week and I ran into a full set of the bells sewn out. Synchronicity!

I spent a few minutes designing this layout. The gray rectangles are for the bells. The white sections would need stippled stitched pieces so I digitized designs that would fit. It is really easy to make stippling designs in the Bernina Artista software. All you have to do is import a jpg of the required shape, trace around the shape’s outline and then click on the stipple fill stitch button. Voila, a design the shape I need filled with stippling.

 Of course, I have a special knack for creating obstacles. In this case the stumbling block was the virgin red fabric I used for sashing. 

My mistake was not pre-washing the fabric. To give myself credit, I’ve heard many a quilt teacher say that if you have good fabric you don’t need to pre-wash. This was good fabric, very good fabric, a laurel Burch purchased from a reputable quilt store. It might have been good, but it wasn’t good enough.


You can see where this is going. I used a water soluble pen to mark the white embroidered panels. When I spritzed the panels with water, the red sashing bled. The once pristine red and white table runner was now a white, red and pink table runner. 


Luckily a little perseverance, a couple of Shout Color Catcher sheets and three times through the wash and the table runner was once again white and red.


I don’t think I’ll write the blow-by-blow about my binding adventure. Let’s just say I’m finished now.


The finished table runner


On another note, I’m giving the stipple patterns to anyone who has already purchased the Bell Choir designs or purchases them now. (E-mail me for the designs if you already own this set.) The designs fit in a variety of hoops though they are easiest to sew if you have a Jumbo Hoop for a Bernina. If you own the very large hoops for a Viking Diamond or Pfaff Creative Vision or the newest Brother or Babylock, you won’t have to do much re-hooping either. 

The pdf version of the pattern is available on my Bell Choir page for anyone to download

Sunday, November 13, 2011

The Sewing Room

For the last nine years, from the time we moved to California, my sewing room has been a mess. It’s a matter of space. This house is smaller than our old Carolina home by more than a thousand square feet. We thought we had left enough stuff behind, but no. We sold, donated and tossed. It didn’t seem to matter. We still had too much stuff!
I admit that I have a lot of sewing supplies. And it’s not news that I’m a fabric slut. Actually, I own a generous collection of the whole sewing trifecta: fabric, gadgets and thread. I love it all, but storage has been a challenge.
So, until recently, my sewing room has been a mess. The words“Clean House” and “Bobbi’s sewing room” have become synonymous.
Well, worry no more. No longer will we have to call search parties to find small children in my sewing room. The days of making your way around mounds of unidentifiable sewing detritus to sew a seam are over. I’ve seen the light. And I’m not talking about a high intensity Ott Light!
It started when I was browsing through a local antiques/thrift/junk store in downtown Placerville.I must have mentioned that I sew to the proprietor because he forced me to the back corner of the store where, tucked behind a stack of motley street signs across from a spring sprung floral sofa was (as he said it) “U’re Going to Love  this. I have right here a Gen-U-Ine Sew-Ing Cab-net.”
Despite the proprietor’s resemblance to a snake oil salesman, he was right. I loved it. I laid all of my cash on his counter and put the thing on layaway. A mere 90 days and a hundred and fifty dollars later, I drove the van home loaded with one Gen-U-Ine Sew-ing Cabnet.
As you can see, it looks like a wardrobe. It’s even kind of shabby chic looking with the white paint. If you look at the paint closely you can see it’s not its original color.
 white-cabinet
It’s a sewing wardrobe from the 50’s or 60’s, from before the days when wardrobes were a common item in a family room or living-room.
Inside the cabinet is a pull down desktop.
open1
And do you see the little gold square?  That’s the Singer label.
singer-tagopen-desk
Pulling the desk down reveals storage, shelves and spool-racks.
There’s even a raised bed to create a flat surface behind your sewing machine. Because my sewing machine isn’t a circa 1966 Singer, the raised section doesn’t match the height of my sewing machine.
Though not exactly right for my sewing machine, it IS right for serger storage and usage. And, the bottom of my cabinet houses the machine I’m not currently using.
bottom
Though I’ve been sewing forever, I had never seen a cabinet like this one. Imagine my surprise when Tecla (a dear friend I’ve mentioned before) called me from a yard sale saying that she had found the coolest sewing machine cabinet ever.
Well, I didn’t believe her cause I had just brought home the coolest sewing machine cabinet ever, my vintage Singer cabinet.
Well, she was right. She had found the coolest sewing cabinet ever made, a twin to my cabinet. It was an identical twin, only still sporting its original pecan wood finish and typical 60’s handles. Other than that, it was the same. And this one was only $25!
brown-cabinet
I’m no fool. I snapped it up.
I use the second one for my computer and storage of a variety of sewing supplies. It’s amazing what happens when you have a place to put things. Now my sewing room looks like this:
full-room
One of these days I’ll re-finish one or both of these cabinets, but for now I’m just happy to have them.
So, Niecy Nash, be gone!
On another note, did you see the gorgeous Bernina 830 in this picture?
I’ve had it since June and other than a few hiccups during the learning curve (all operator error), it's been perfect. I'm giving it a work-out. I love this machine.
If you’re wondering at all why it’s been so long since I’ve written a blog post, it’s because my creative writing muse had been busy helping me write a book. I can’t say much more about it except that I’m done with my part. It will now take the publisher another year before it’s out the door.
I am happily back working the blog.

Saturday, July 2, 2011

On Becoming a TV Star

The following was written in March, when I taped two segments for the TV show "It's  Sew Fun".

The show is beginning to air on PBS beginning June 30.  Contact your local station and request that they pick up the show to air in your area.

In my never ending quest to become a sewing celebrity I accepted the invitation to appear on the upcoming TV show, “It’s Sew Easy.” To tape my segments, I journeyed cross-country to Cleveland, Ohio, which seems to be the Hollywood of sewing shows. As in every good journey I had to conquer a variety of obstacles, the biggest of which was the weather, which bestowed an irritating blizzard in my path.
Because of the kindness of strangers, strangers who later became friends, the weather proved to be more of a worry than an actual impediment.
the-van-in-the-blizzard
During my time in Cleveland I was befriended by one of the other newly discovered TV stars, Trish, of Two Peas in a Pod and her one-woman entourage, Kristen. Kristen generously expanded her entourage work to include us all. She performed not only the expected entourage tasks, braving the snow for Starbucks for lattes, checking each of us for stray threads, lipstick coverage, and no unruly hairs, but she also rose early and attacked the snow with a snow shovel to make sure the van was available for transport.
kristen
It was lovely to have an entourage, even if I was a peripheral entourage-ee.
In addition I had the luxury of having my make-up done by Karen, the make-up artist.
in-the-makeup-artist-chair
She exposed the real me, the Angelina Jolie rival. I’m currently choosing which venue to attack next: America’s Top Model or Dancing with the Stars. Can’t decide which will showcase my new-found beauty most.
Most of my time in Cleveland was spent in the Green Room, the area assigned to stars awaiting their taping time. I’ve heard stars recount their time in David Letterman’s, Ellen’s and Oprah’s Green Rooms. Odd, not one of them mentioned that the green room was populated with sewing machines and sergers.
green-room
I had scheduled the time in the Green Room to finish last minute preparations for taping, and I did do that. But, thanks to the help of my my wonderful friends/helpers (you can read more about that on my previous blogs ) and my oft mentioned friend, Tecla, I finished my prep work by noon the first day. Tecla had made the step-outs I needed for the show (the multiple versions of the works in progress you see so often at sewing shows) while I was at the Sew Expo show in Puyallup.
I’m look forward to repaying that debt; a task that will be completed as soon as I learn to spin straw into gold.
green-room2
Anyway, because of everyone’s help, I was able to focus on the real work taking place in the Green Room, socializing and eating.
I loved my fellow Green Room inhabitants; a wide range of sew-ists ranging from young to old, from those re-working sweatshirts to those sewing bags, from those in the home-sewing industry to a Project Runway participant. And then there was me.
The Actual Taping
Part of the fun of the Green Room is watching as each presenter tapes her segment. We gathered around a TV just a little larger than the state of Rhode Island, commenting on the important stuff, nail polish color and how many times someone said, ‘uh.’ The studio is soundproof so the ‘star’ never hears the peanut gallery’s comments, luckily for me.
HD has added an interesting dimension to television, a clear view of the presenters’ pores and facial flaws, giving me something to really look forward to; seeing my facial imperfections broadcast to all of America.
My studio time started with a director attaching a microphone to my clothes and placing an earbud in my ear. This had the potential to be strange but for me it was a good time as the director was a cutie. After a sound test and a light test, it was go time.
miking-up

onset
I taped two segments, the first on multiple hoopings in the embroidery machine, the second on re-working jean jackets.
I’m not going to write much about the actual taping. You can see the results when my segments air. They went well. I didn’t forget and pick my nose or scratch my crotch or anything. I didn’t say forbidden words.  (One of the tapers said “Oh, my God” 6 minutes into her taping and had to start all over again).  I know that I paused a squinch each time the producer talked into my earbud (she gave me time warnings at each minute mark) and once in a while I faced the wrong camera, but in general the taping went well.
I loved it! I loved the whole thing, from the Green Room experience to the time in front of the camera. OK Letterman, I’m ready for you.

Friday, June 24, 2011

The New Sewing Machine

Today tested my will power almost to the breaking point  My new sewing machine arrived and I didn’t rip open the box, tear through the packaging, and get the thing stitching. Instead, that luscious piece of perfectly engineered metal is still nestled in it’s styrofoam nest. You see, I’m heading to a retreat Sunday and I’m taking the machine with me. It doesn’t make sense to unpack the thing only to have to pack it up again 24 hours later.

box

I don’t think I’ve mentioned this before, but I’m a retreat slut.  I LOVE a good sewing retreat and each year I go to as many retreats as I can.The retreat Sunday is  given by my ASG Chapter, one of two retreats it holds each year at Lake Tahoe.

So I’m taking the new machine to Tahoe where, surrounded by the beauty that is Lake Tahoe, I’ll experience the magnificence of a  Bernina 830 for the first time. Meanwhile, the box sits teasing me in the living room. I have my fingers in my ears but I can still hear it calling. “I’m waiting. Unpack me!”

And if that isn’t enough frustration, for the last week my computer has been keeping me humble. Last Friday, as I was diligently pecking away at the keyboard, I glanced up only to find that no letters were appearing on the screen. I tapped the A key, then the S, nothing; the X key, the Z, still no results. Then, when I hit the escape key, the computer went very, very quiet. After a reboot I found that touching the keyboard gave the charming results of powering down the computer. 

With a bit of experimentation I found that the computer works fine with an external keyboard but that configuration is not the most wieldy thing in the world (as in wieldy, the opposite of unwieldy).

I called Dell’s tech support  and within hours I had received an email that a new keyboard heading my way. That was last Friday.

Today is the next Friday and I still don’t have the replacement keyboard.

According to the UPS log, my keyboard has had quite a tour of the Midwest.

The keyboard left Nashville on the 17th and went to Indianapolis for the day, followed by an evening jaunt to Louisville, Kentucky.

Obviously the keyboard was not satisfied with it’s brief visit to Indianapolis, so after spending the day in Louisville, it went back to Indianapolis. The next day it went back to Louisville.

I take it that a second visit to Louisville was enough for it, so it finally headed west to California.

This morning it arrived in San Pablo. Tomorrow it’s supposed to get here. We’ll see.  For all I know my keyboard will lounge around the bay area for a day or two completing its leisurely trip.

Until I get the keyboard and face the fun of installing it in the laptop, I have my new sewing machine to dream about. It is  here and awaiting launch. Did I mention that it’s a Bernina 830? Sweet! 

I’ll write more about the sewing machine when I get to the retreat. Hopefully, I’ll be writing on a keyboard that’s actually installed in my laptop.


.

Thursday, April 21, 2011

The Tale of the Top part 2

bobbi2_smIn January I wrote the tale of a stalled out project, a pink silk top for which I had taken the dead-end path of fitting myself. Fitting yourself is like cutting your own hair. No matter how beautiful the front looks at some point you have to turn around and the back tragically shows.
The top, Vogue V7828 (now out of print) is a crossover wrap top with seams crossing the front diagonally. By fiddling with the seams, I came up with a great fit in the front. The blouse skims over my curves and highlights my best feature, a small waist. Because the eyes in the back of my head were not working correctly, the back was not as pleasing.

bobbi1_sm
My choices were to throw the thing on the scrap heap or seek help. I hopped right on it, a mere 12 weeks after discovering that the back of this top was so unflattering, I met with my favorite fitter, Anita Marshall.
Before the meeting I had constructed a second muslin using my front adjustments. I donned the muslin for Anita and was rewarded with ‘oohs and ahs’. Then I turned around.  That’s when I heard it, that “tsk, tsk, tsk,” sound you never want to hear from a fellow sew-ist  (A sound I usually hear only when people get a glimpse of my sewing room). Anita agreed with my assessment. The back was my Titanic.


bobbi1_back_sm
Actually, it didn’t take Anita long to figure out the fix. She took a large pinch across the back, parallel with the waist. It seems that my back from shoulders-to-waist is short. I shouldn’t be surprised at that as my front, from the shoulders-to-waist it short, too. With this pattern I had sucked up the extra fabric while fiddling with the front seams. With this pinch, the fabric smoothly skimmed the curve of my back. She redrew the arm-scythe and reduced the shoulder width (about 3/4” each shoulder) and we were done.
I am VERY happy with the finished results. Now I look good both coming and going. I’m anxious to find the right occasion to show off this piece. Maybe I need to manufacture an occasion.

bobbi1_cu_sm
The designs are from the Flowerful set (by the way).

I’m ready to resume my work on the green vest I wrote about last time. Hmm… it’s only been a month or so since I started that one. Maybe it needs to age a bit more.